Creating a Simple Captioned/Lyrics Video with VSDC
Hey Hey! Here's a quick tutorial on how to make a simple text video with VSDC.
VSDC is free. (Though, FYI I have the paid version, so I can do more complicated animations.)
A background image or video (that you have permission/rights to use)
Your audio file (cleaned up)
A transcription of the audio (Just the text. Time stamps aren't needed for this tutorial.)
VSDC (or similar program - the program just will look different and the steps/actions may be called different things.)
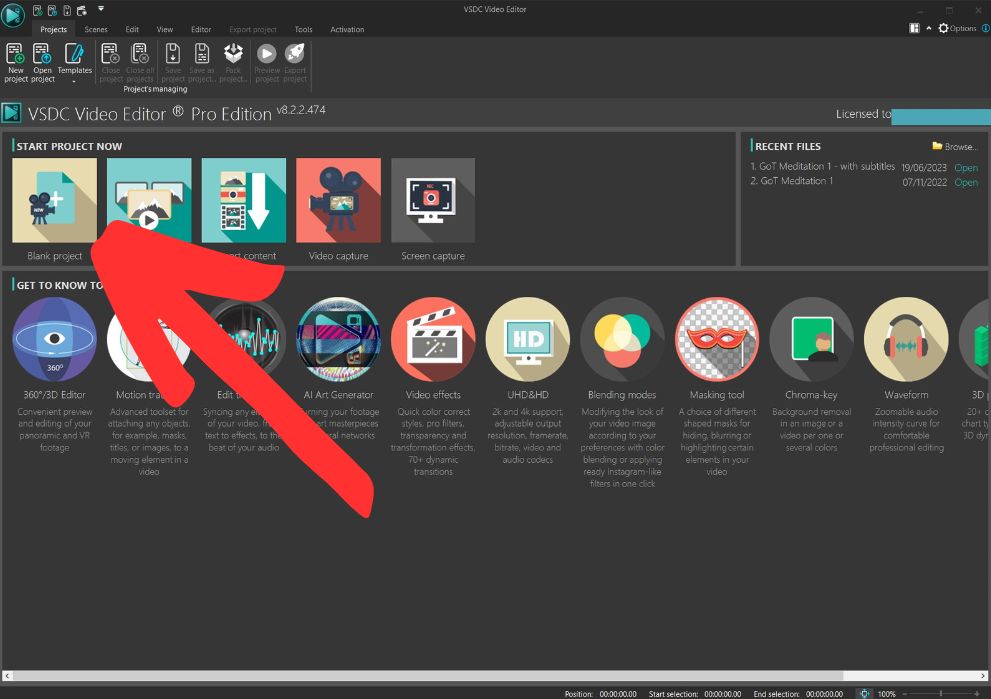
Open up VSDC. And click on 'Blank Project'.
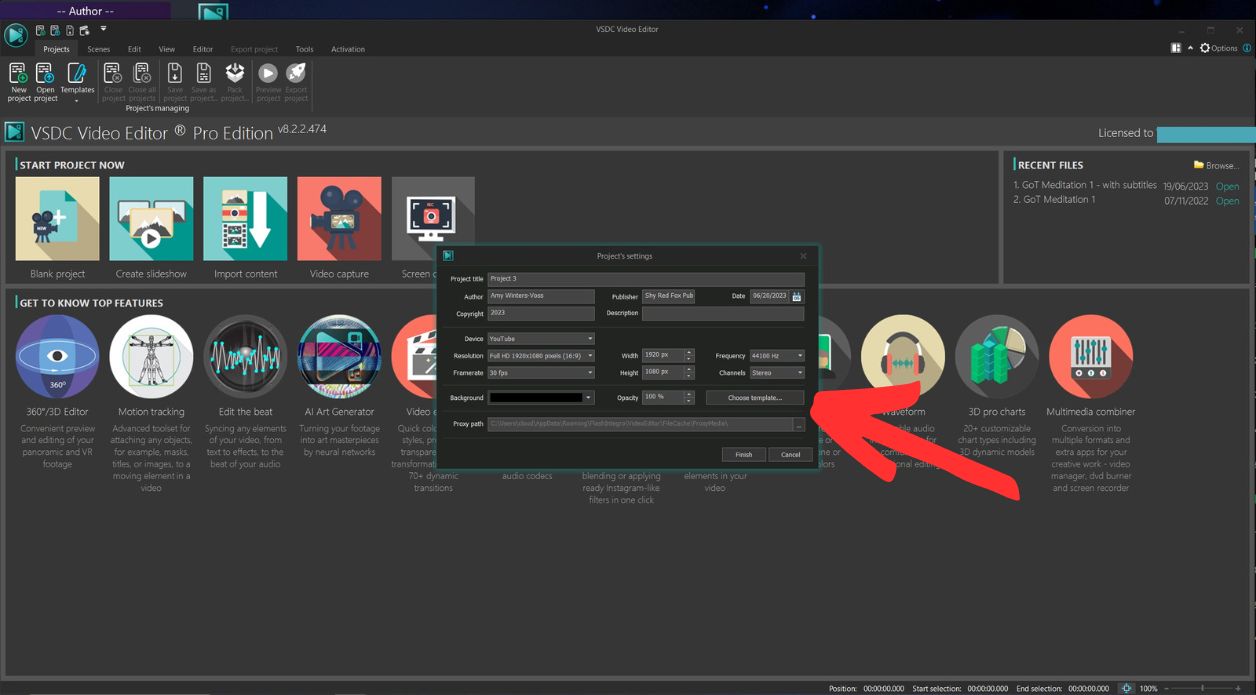
I use the 1080p settings for YouTube for most of my projects
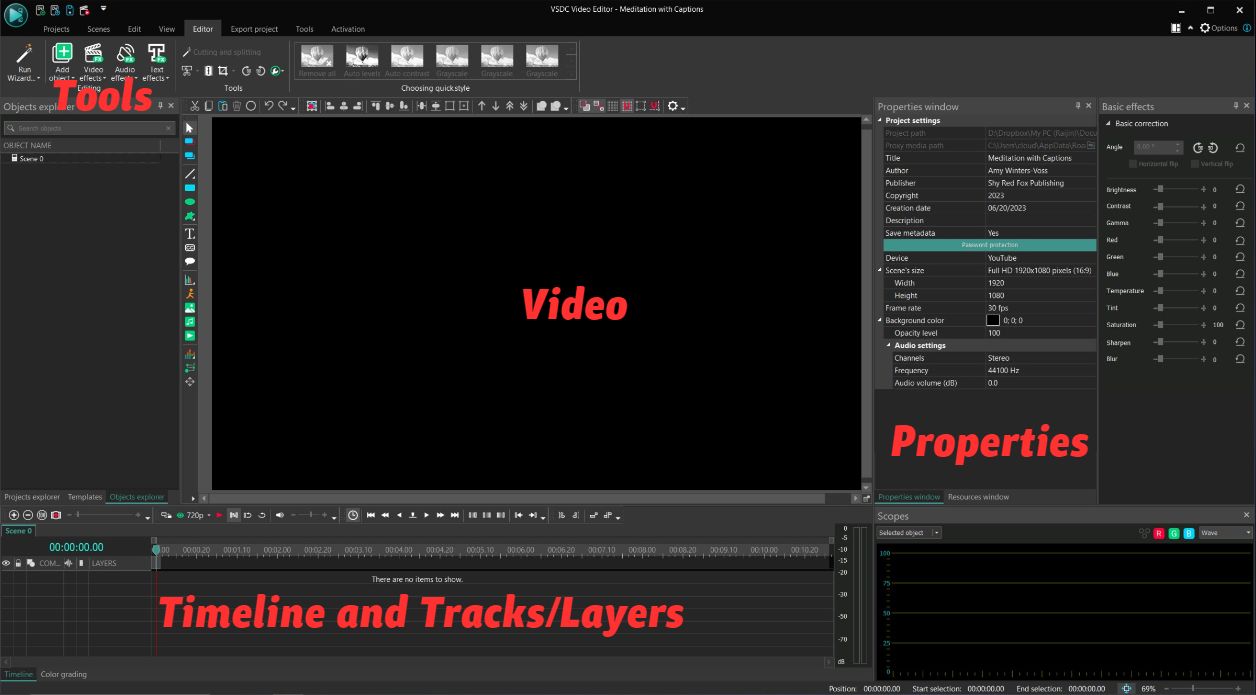
When it opens up, your interface will look like this.
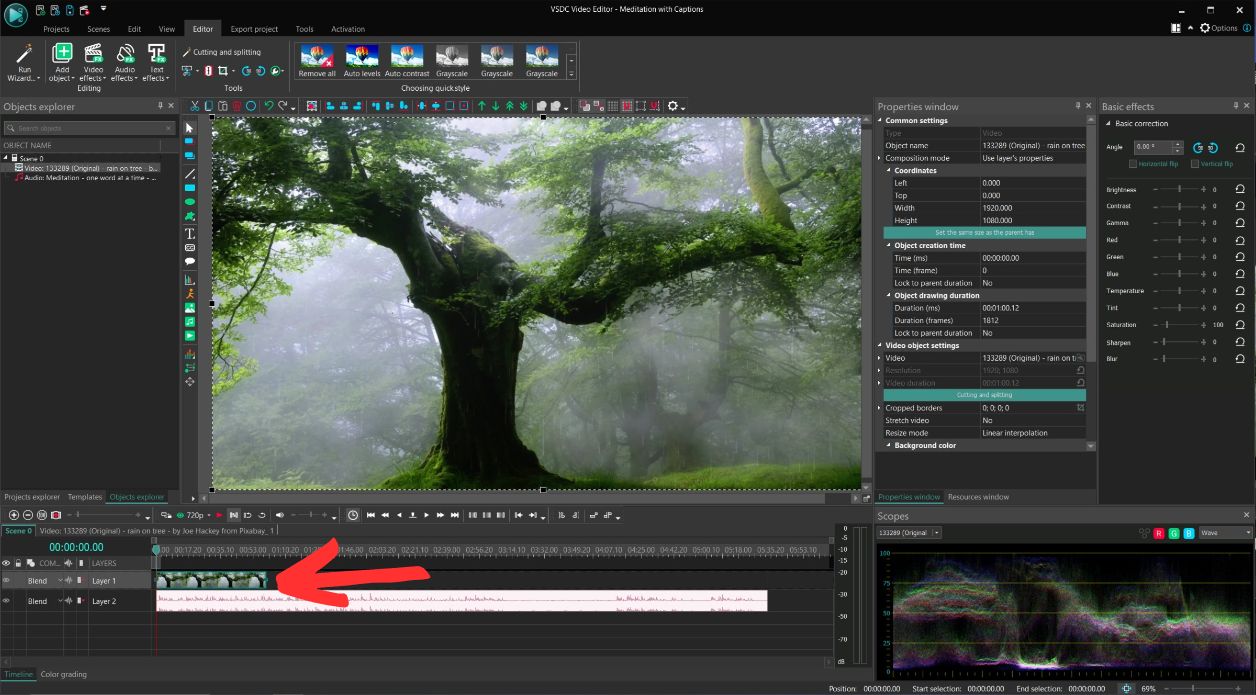
Drag your background (image or video) and your cleaned up audio file into the timeline.
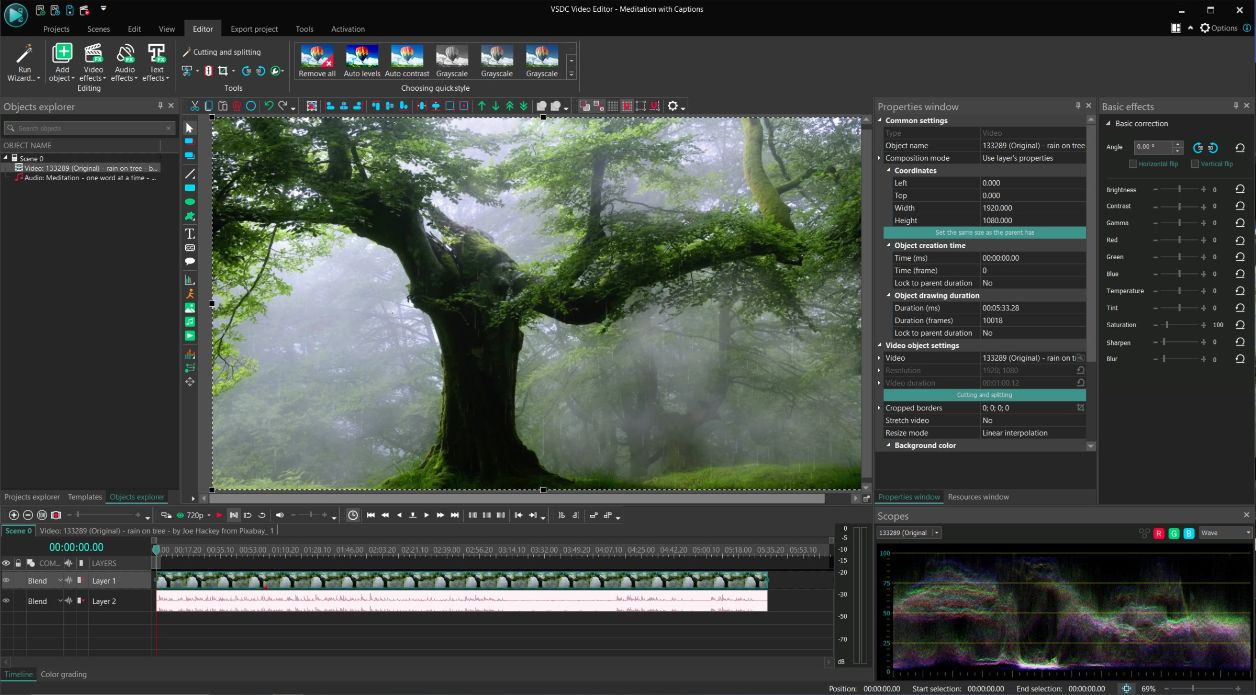
Then click the little square (the handle) on the background layer to make it the same length in the timeline.
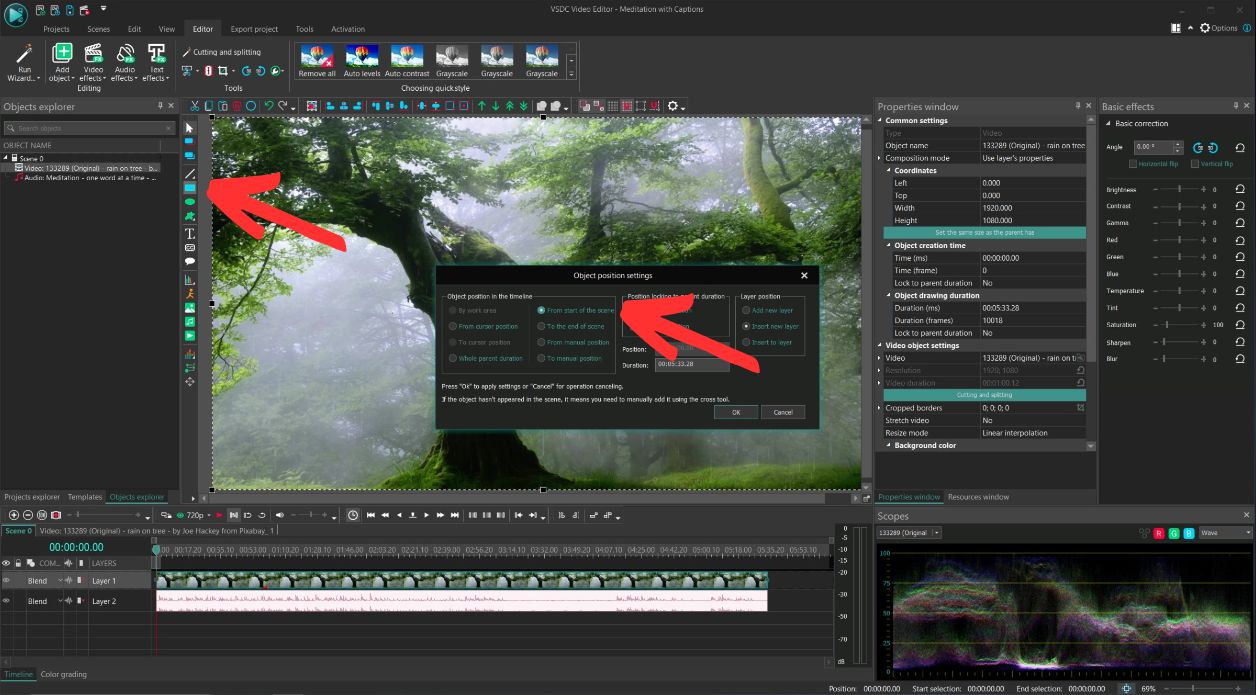
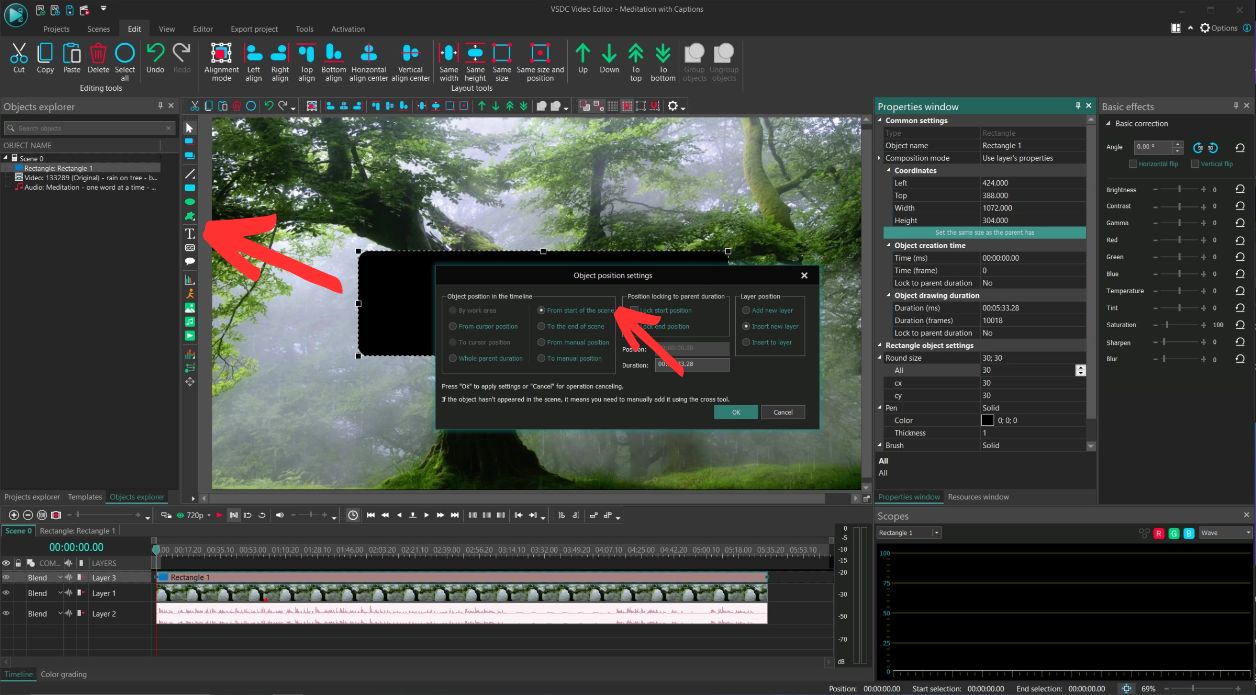
Let's make a rectangle as a background for our title text. Select the 'rectangle tool'. I want my title intro to start right away on the video. So I'll click on "From start of the scene' and then click 'OK'.
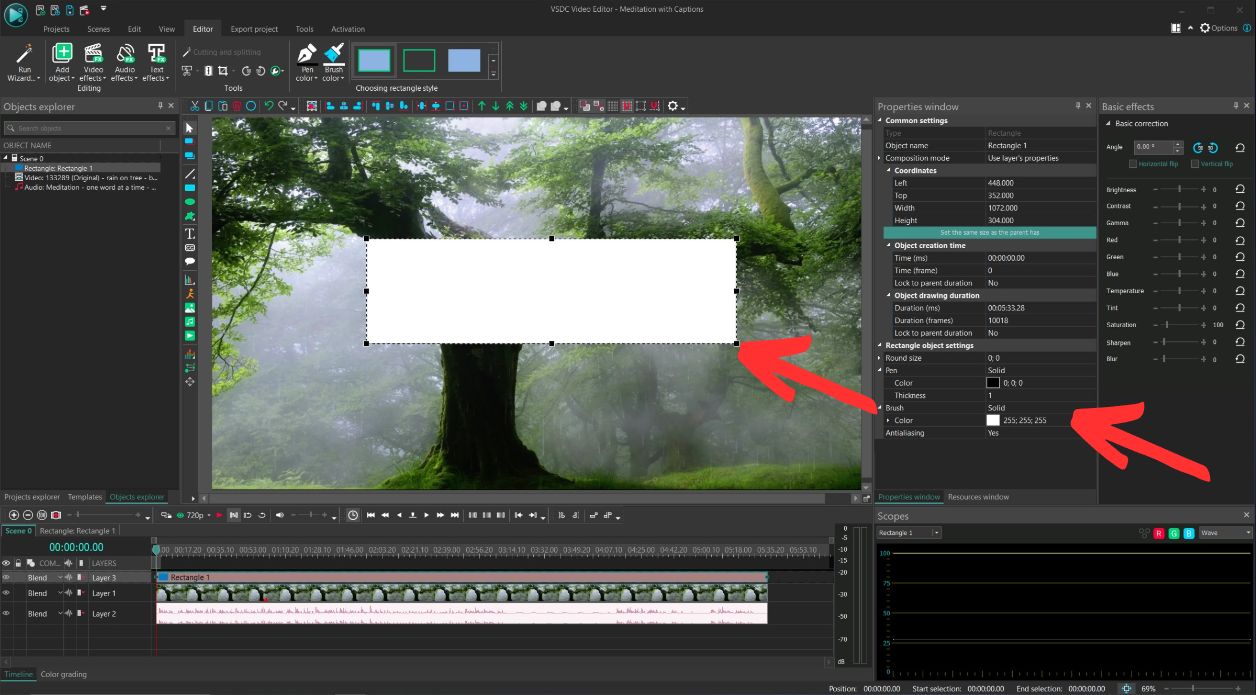
Then click and drag on the screen to draw the box. When you're done, you can pick the color over in the properties window by clicking the '...' to the right of the color. Then click 'OK'. I'll make mine black.
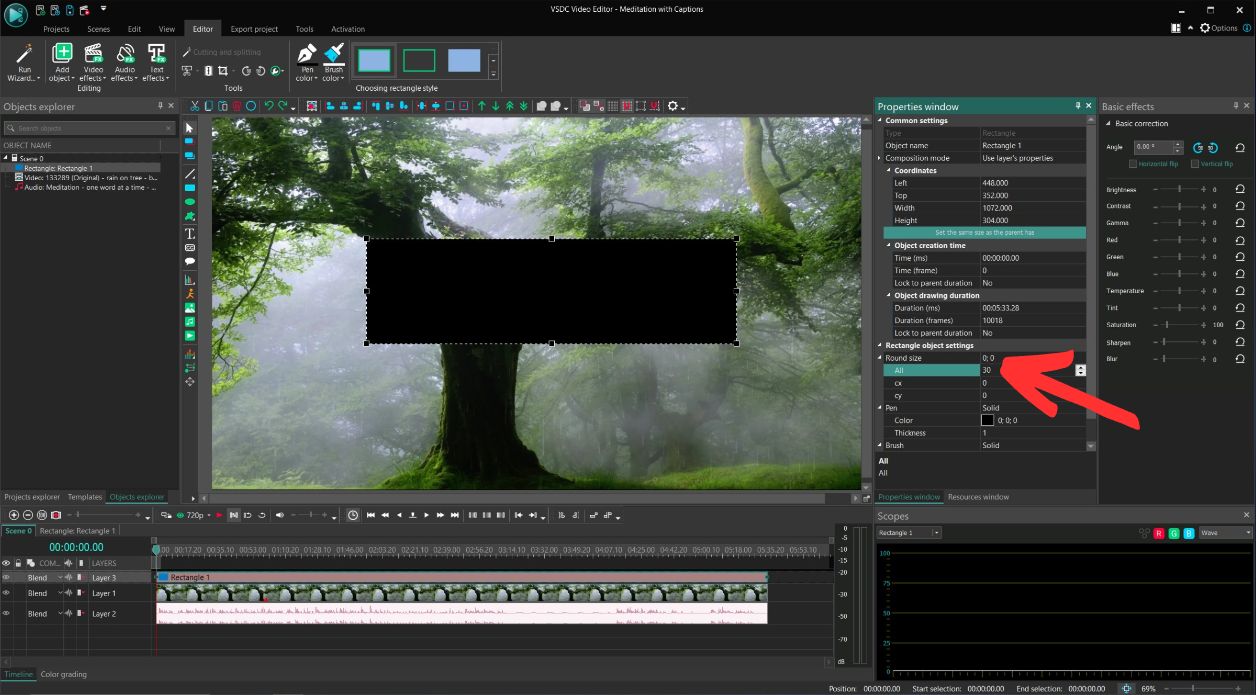
Let's round the corners of the box. Click the triangle to the left of 'Round size' to expand the input and type '30' in the box next to 'All'.
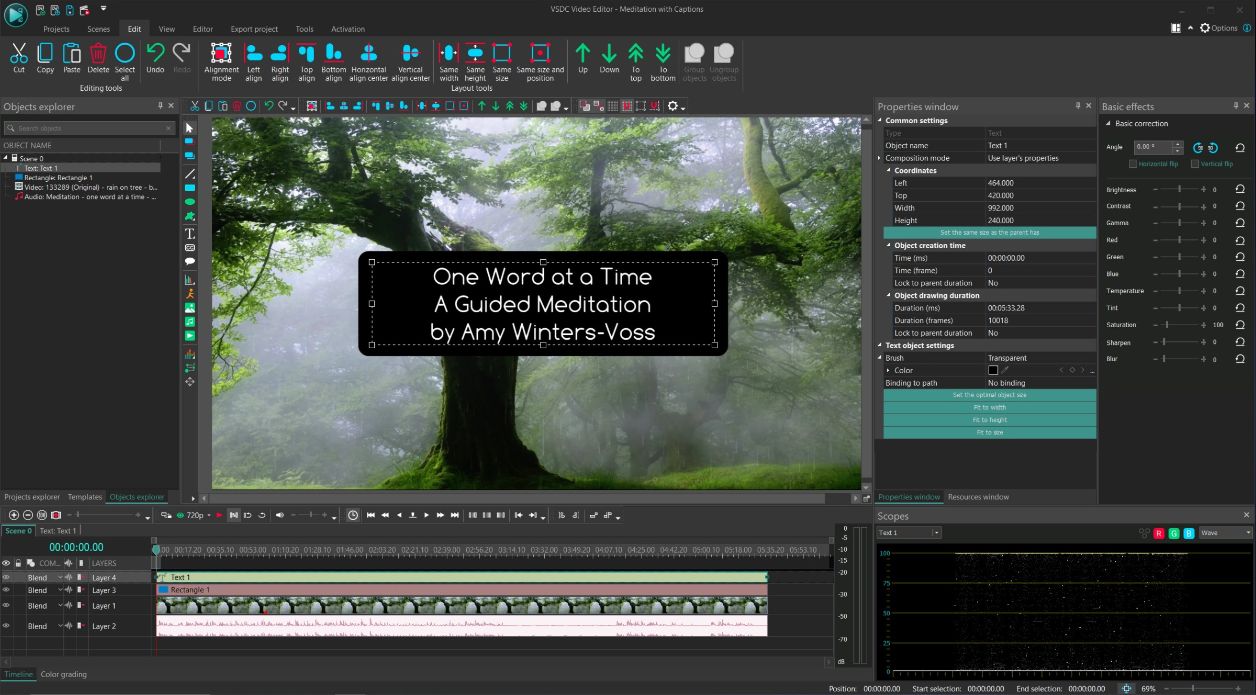
Mine isn't quite centered. So let's fix that. Click 'Edit' in the top menu, then 'Horizontal align center' and 'Vertical align center'.
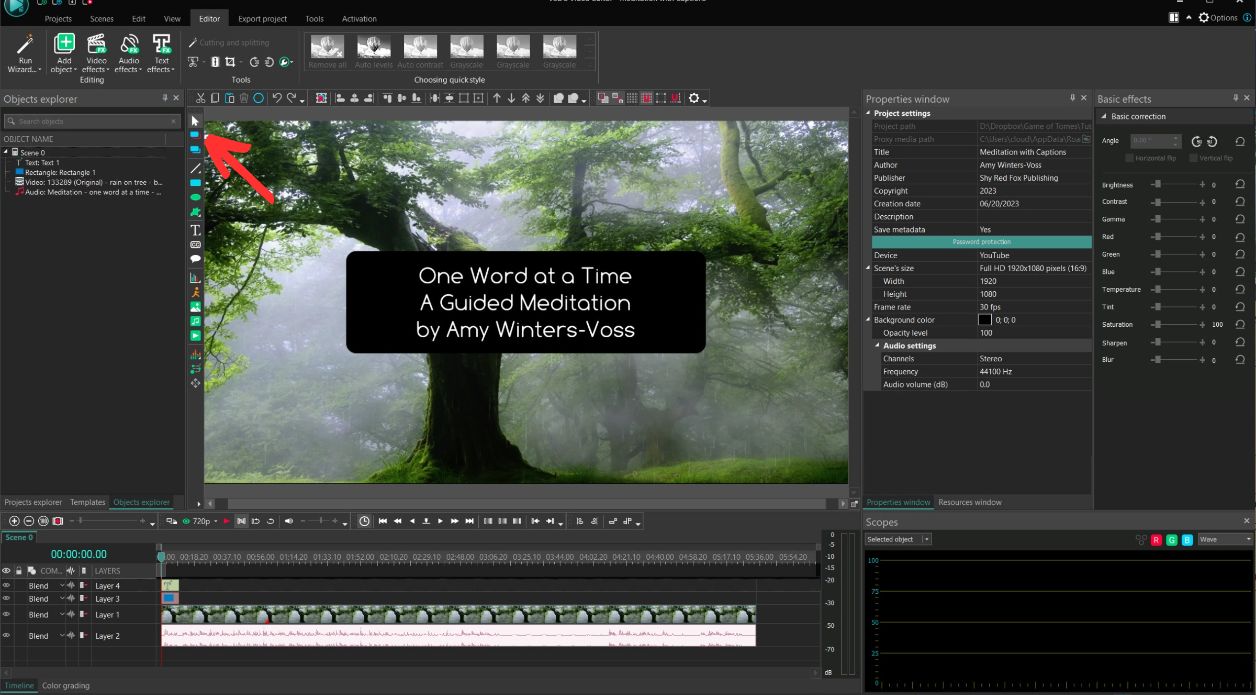
Now to add the title text. Click on the 'T' to the right of the video window. And have pick 'From start of the scene'.
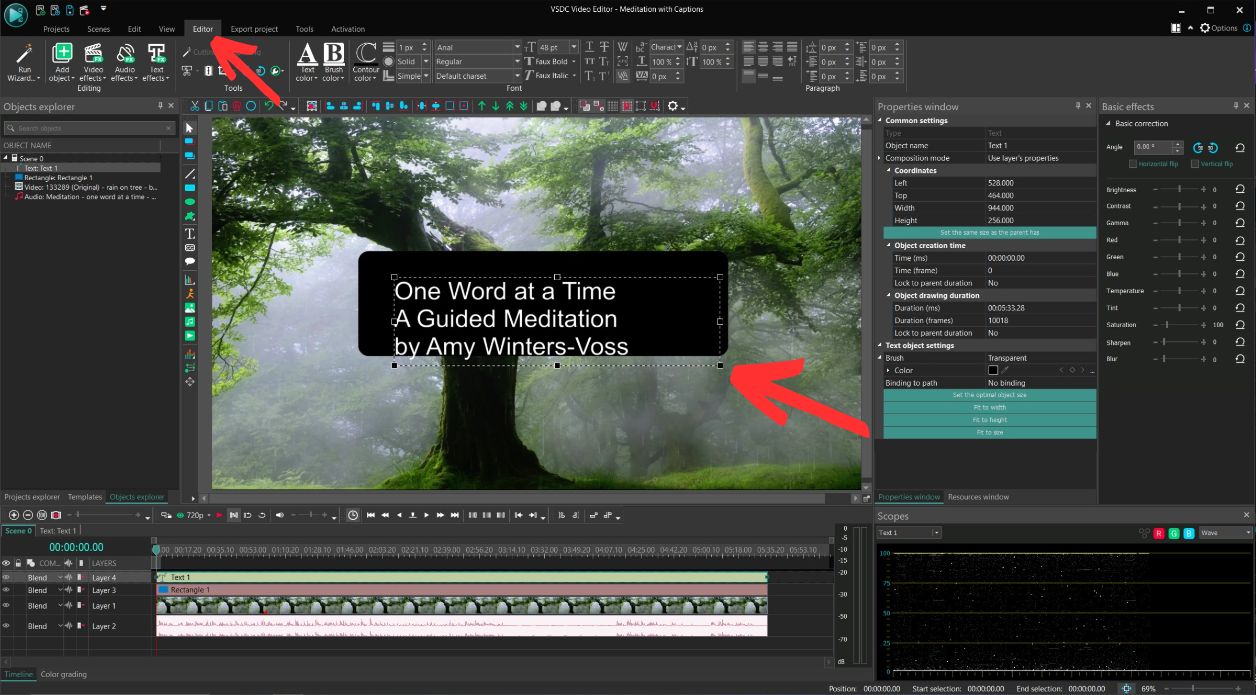
Next, click and drag to draw your text box and type your text. Don't worry if the box isn't big enough yet. Once you're done typing, click outside the text area and you'll get the square resize handles. Resize your text box.
Then go to the 'Editor' tab of the top menu and you can change your font and justification, etc. You can also center it like we did the background rectangle (under the edit menu). Now we have our title screen.
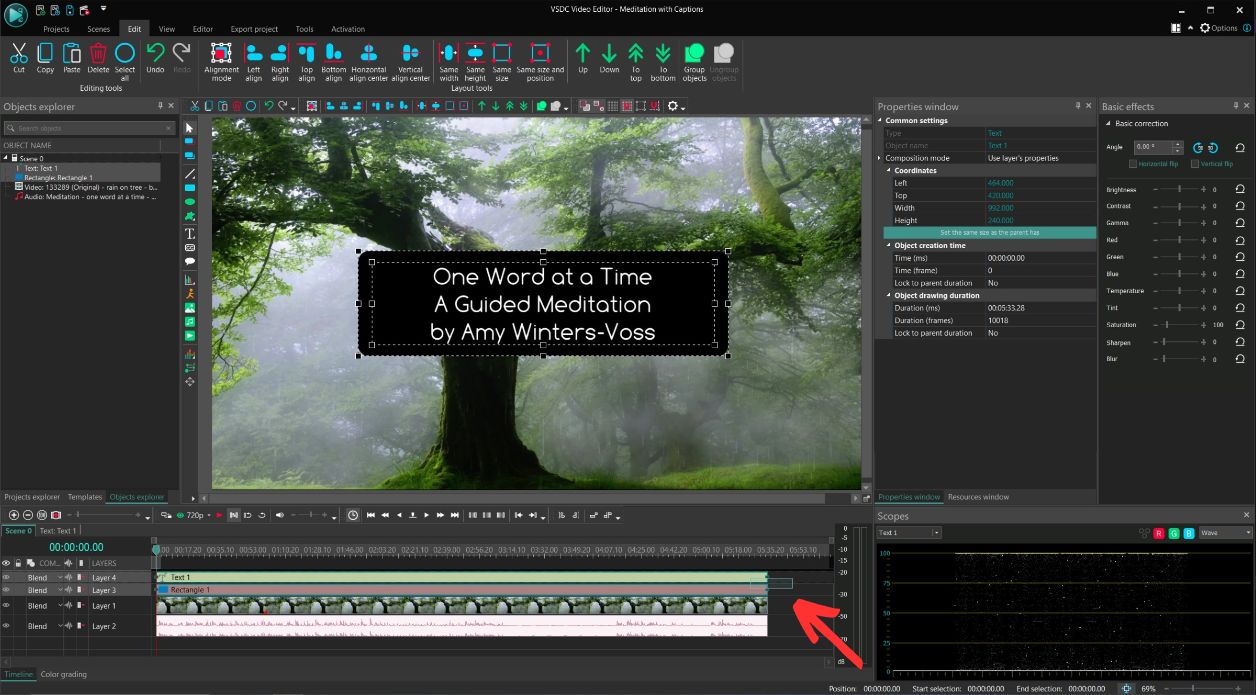
But we have a problem. We don't want the title screen to be in the entire video. So we'll select those two layers and resize them. Do this by clicking in the timeline and dragging into those 2 layers. Then they will both be selected.
Use one of the black square handles to change the length of the title and rectangle together. (Play your video to see where you need to end the title screen.)
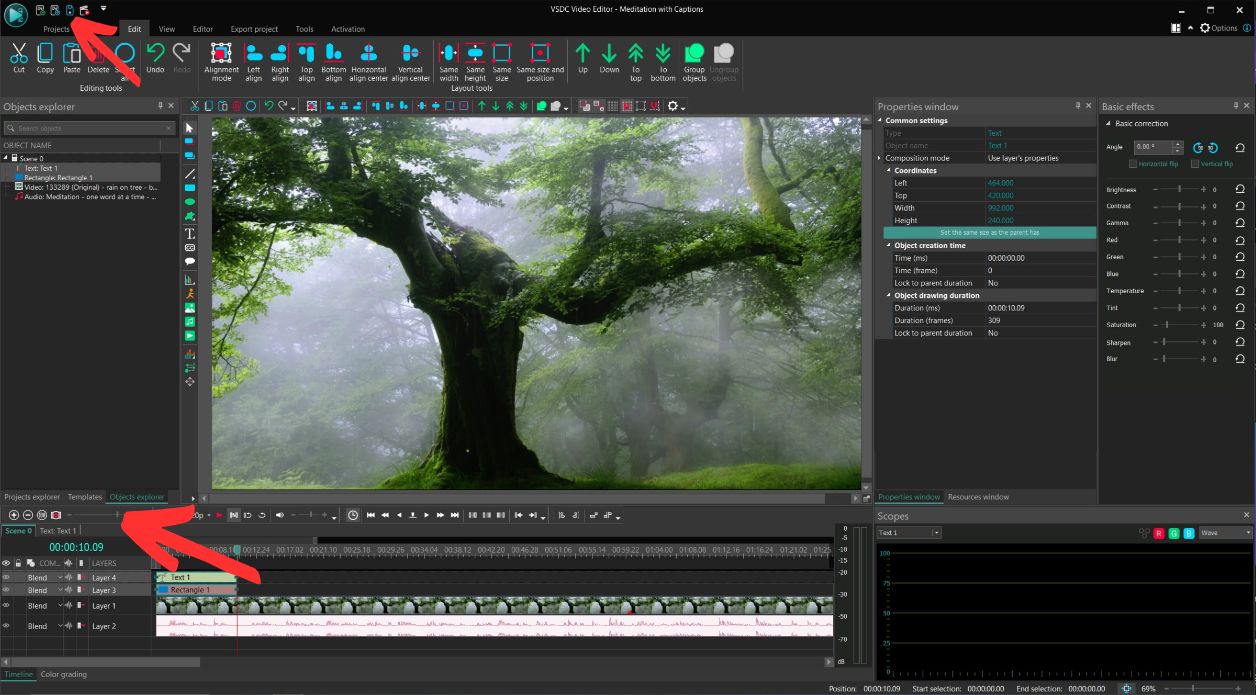
You may need to zoom in to get this right. Once you do, save your work!
Click on the sprite tool on the left of the video window.
In the pop-up, tell it where you want the sprite container to start. I'll choose "From start of the scene" and click OK.
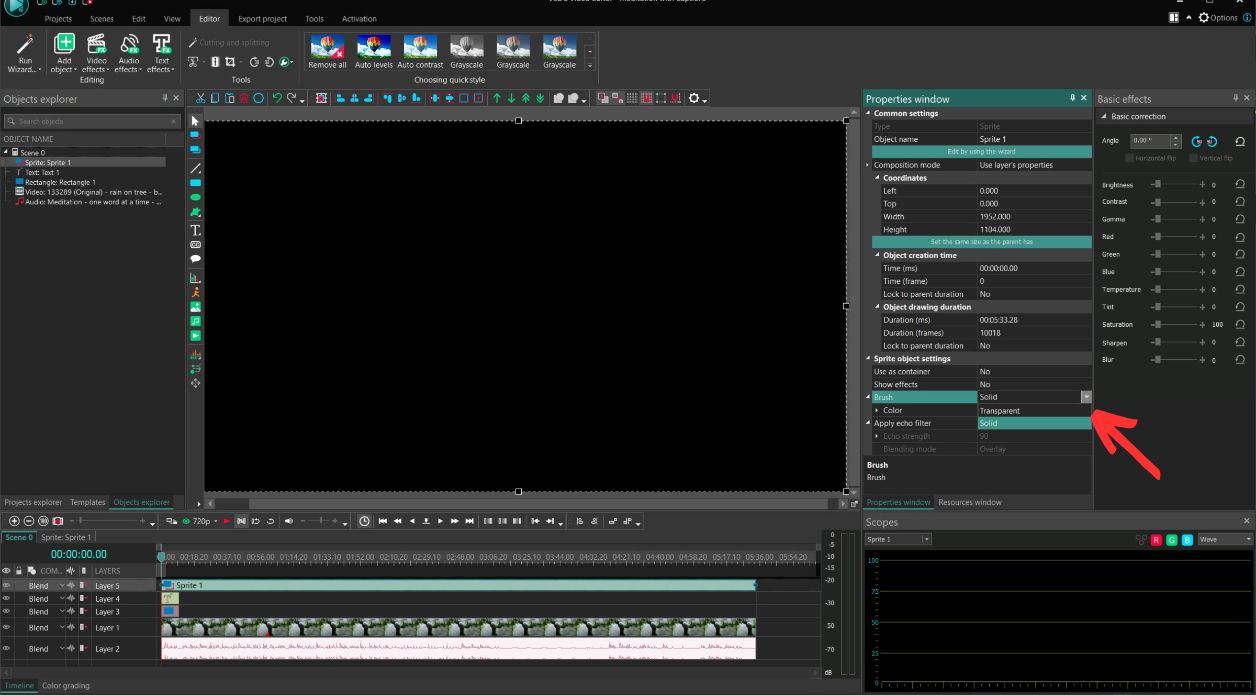
Now you draw the container box on the screen by clicking and dragging the mouse. It will fill that space with a black box. Go ahead and fill the whole screen.
Over in the Properties Window, in the brush dropdown menu, choose Transparent.
If you need to resize your sprite after this, go ahead.
Select the title box and text. (Reminder how to do this in )
Cut those two items/layers. (CTRL-X or Command-X)
Double click on the sprite layer you just created and it will open the sprite level view on the timeline.
Click on the timeline and paste those layers into the sprite.
You might need to put the text layer above the rectangle again. Right click on the text layer. Order->1 Layer Up. (Or use the keyboard shortcut ALT/Option-Up Arrow.)
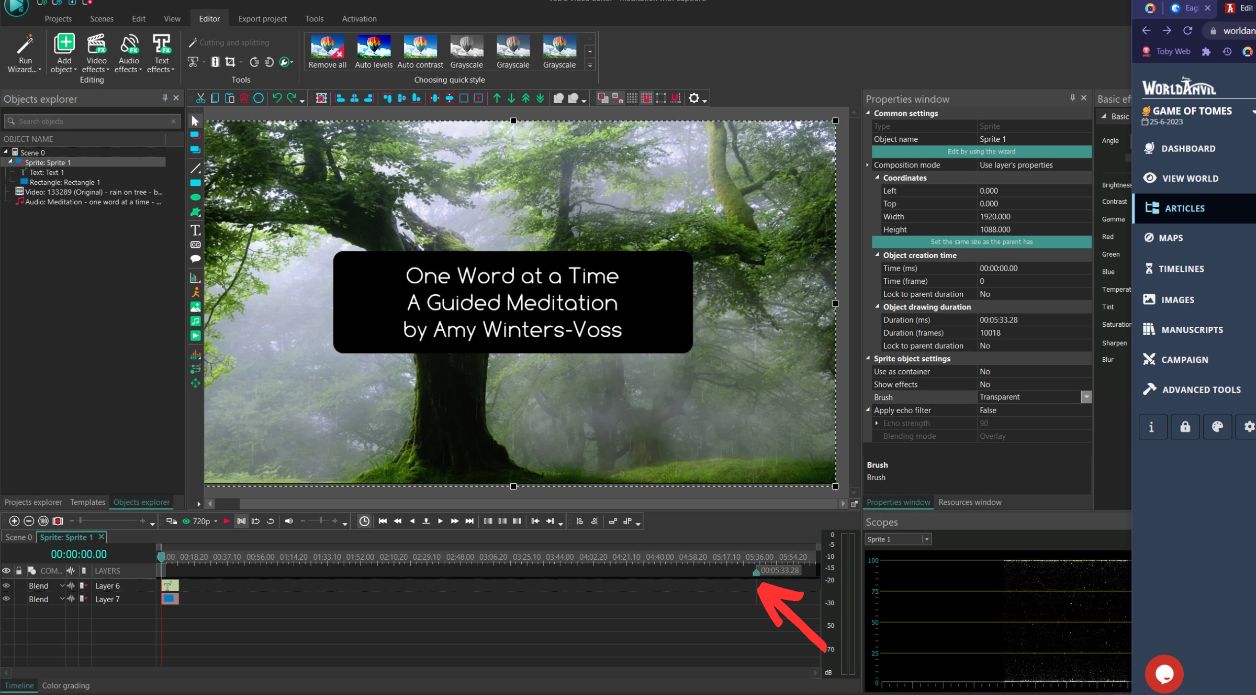
Resize the sprite to be the same length as your title elements. Click the green "end" marker and drag it over to your title elements. You may have to drag a few times and the timeline will resize. But go until the end snaps to the end of the title elements.
NOTE: To get back to the overall timeline view, click on the Scene 0 tab.
We'll use this in the next step...
Go back to the Scene 0 tab.
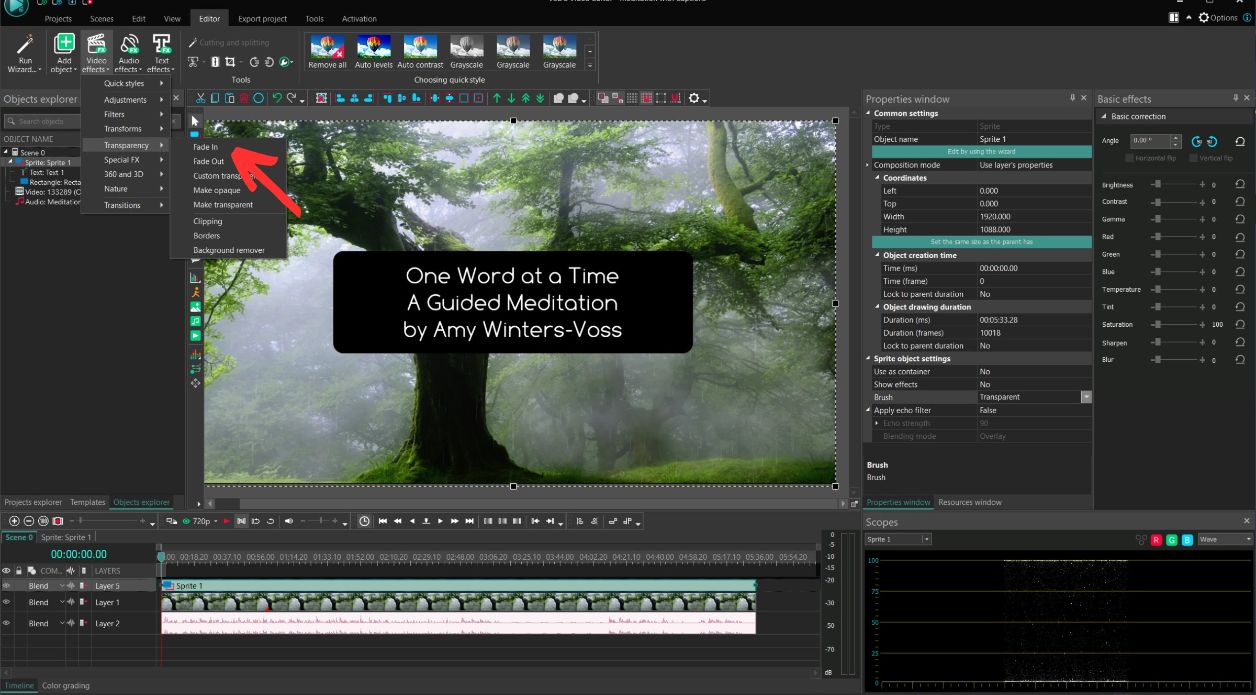
Click on the sprite you just made. (Mine is "Sprite 1".)
Then click on Video Effects->Transparency-> Fade In. Again, choose "From start of the scene" (in this case the start of the sprite).
Do the same for Effects->Transparency-> Fade Out, but this one should say "To the end of scene".
Click over to Scene 0, scoot the cursor to the beginning of the video, click the little red "play" button triangle above the timeline, and watch the magic.
Let's create the first caption box. (We'll use it as a pattern for the rest.)
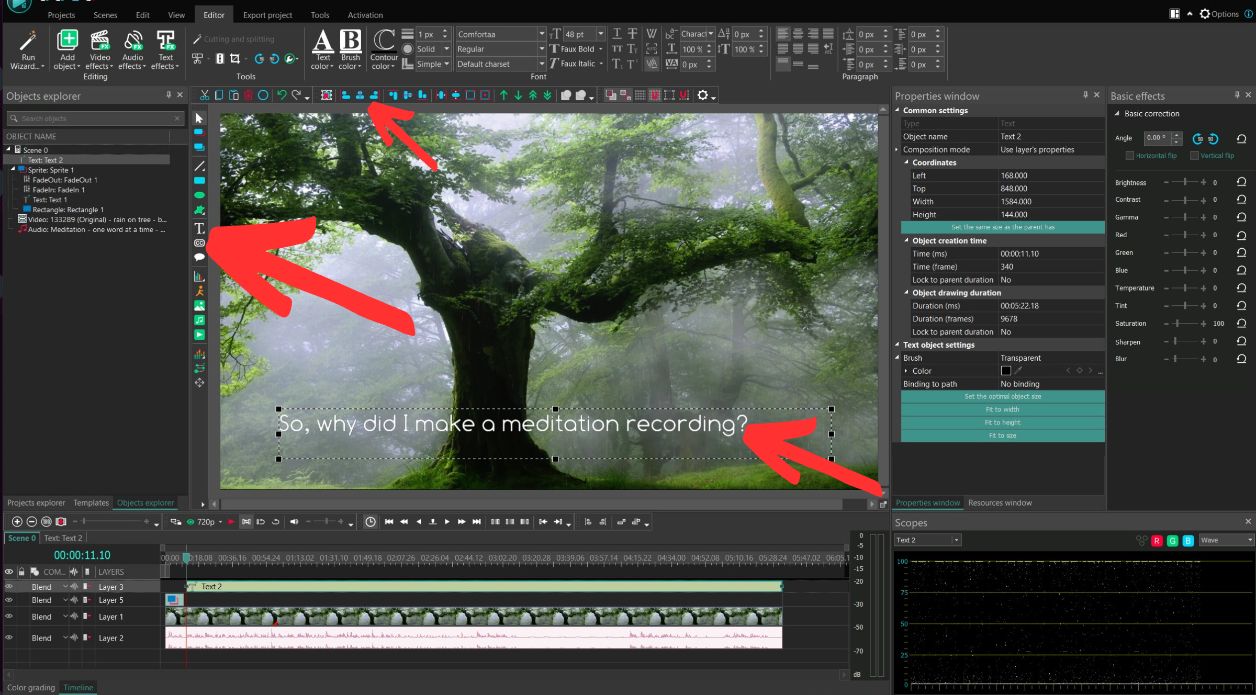
Click on the text tool. Click and drag a not tall box most of the way across the video. And paste your text into the box. Then center the box and change the font, justification, and font size if you like.
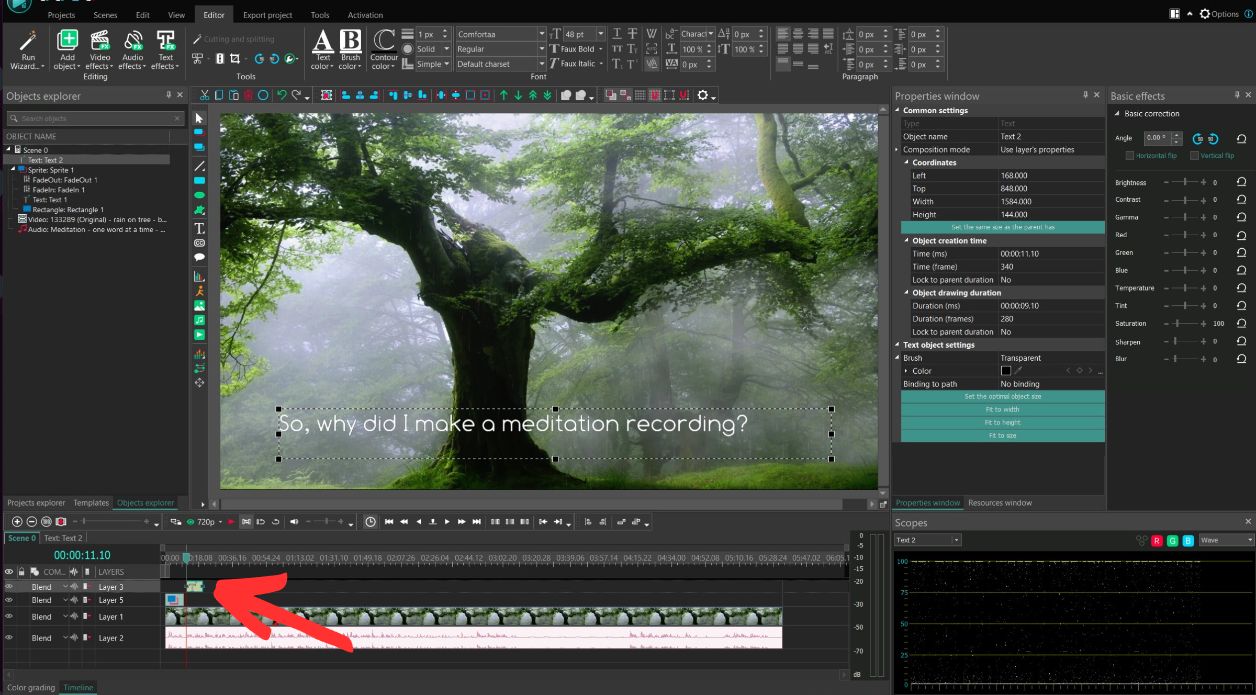
Make your text box on the timeline small. About the size of the title text sprite. We'll resize it more precisely in a minute.
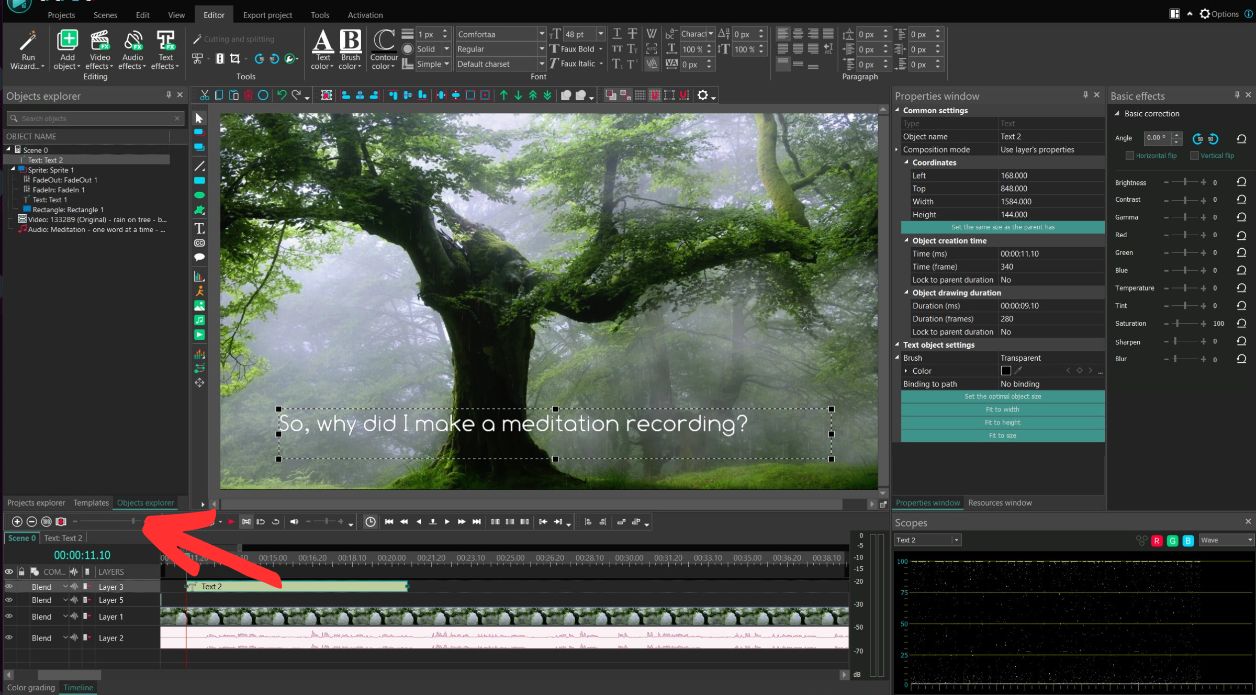
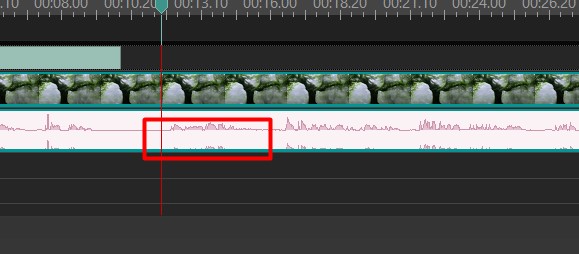
Zoom in on the timeline using the slider (the one with the - and + on either end), so you can see the individual phrases in the audio layer. Like this...
Move your text box in the timeline to match the phrase in the audio, leaving a little extra of the text box before the phrase. (This helps readers keep up with the text.)
Add a fade in and fade out (just like we did with the title screen).
Watch the section of video with the text box to be sure you have it right.
Now you have a template for your text boxes, about the right size for phrases with fade in and fade out already applied.
So copy and paste it for the rest of the phrases. This will make a new layer with your text box.
Move it to where you need it.
Click to edit the text and resize the box on the timeline as needed.
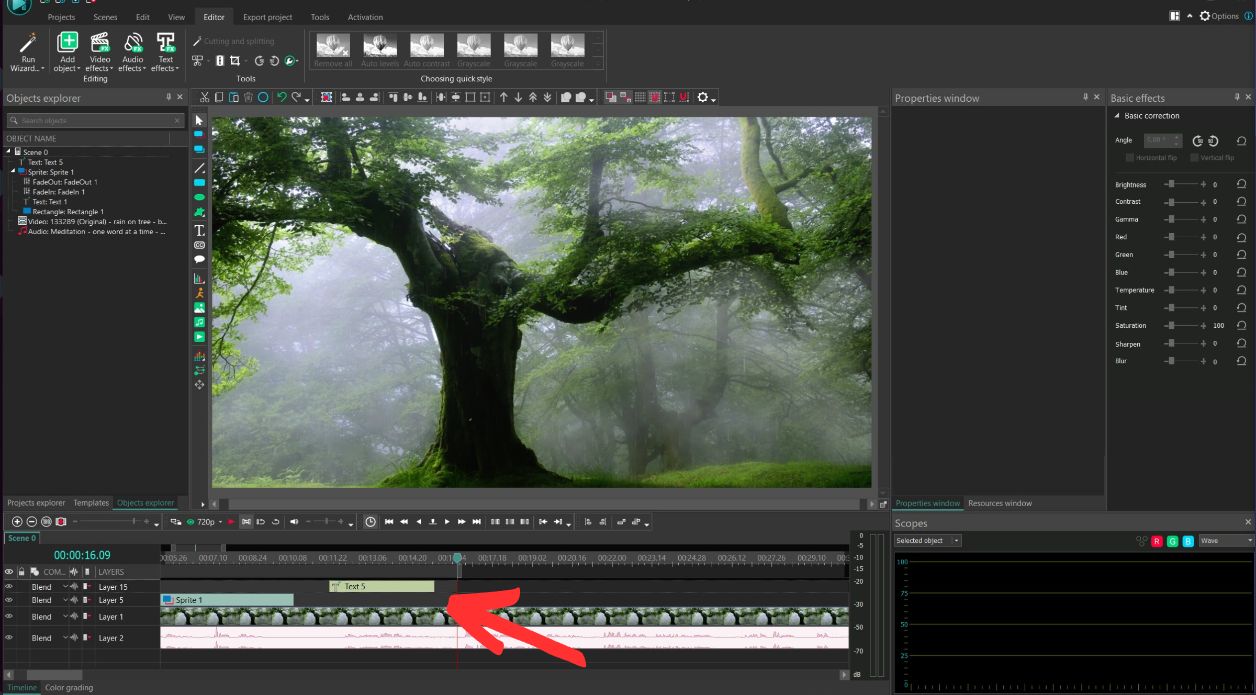
When you get quite a few of them, convert them to a sprite - to save screen realestate. Select the layers and type Control/Command-P.
Remember to save along the way.
VSDC Website
VSDC YouTube Channel
Purpose
To help you learn how to make a simple lyrics/"captioned" video. ("Captioned" here isn't using the official style of closed captioning with the box and 'cc' inside. This is simpler and doesn't require knowing the exact time stamps. Good for short videos or lyrics.)Overview
We'll create a simple text on a background lyrics style video.What you’ll need
Audio tutorial will be in a future video
But the quickie reminder is to use the best audio you can. Turn off noise makers like loud fans and don’t record when there are noises like cars driving by and airplanes flying over.Program Intro and where to get VSDC
VSDC has a free version that has everything you’ll need for this tutorial. They only thing I can’t do with the free video is complicated item movement (more than 1 direction) with the free version, for the things I’ve done.https://www.videosoftdev.com/free-video-editor/download
Tutorial Note
If there are multiple arrows in a screen shot. Go from biggest to smallest for the steps of the action.Set Up Your Project
Adding the Title Screen
Depending on your video, you may need to move the audio over to the right on the time line about 10 seconds if you don't want it to play during the title screen. Click on the layer and drag it to where you need it.
Advanced tips
Sprites
A sprite is a tool to "merge several media objects into one and apply effects to the entire group." *[*VSDC help page on Sprites] For this tutorial we'll create a sprite to put the title screen elements into. To create a sprite:Fade in and fade out
Let's make this snazzy and add a fade on each side.It's a good time to save your work! CTRL/Command-S
Captions Text
Just a little more to go over, then you'll have the lyrics/captioned video down pat! Up next, we're going to create several caption bits.Dont' forget to add credits - mention/thank anyone who helped, did voices, images, videos, etc.
There is specific wording that needs to be used for any Hero Forge images. Please see HeroForge Video Credits for the necessary wording.
Watch the video all the way through to ensure you have the timing right. Then SAVE!
Export
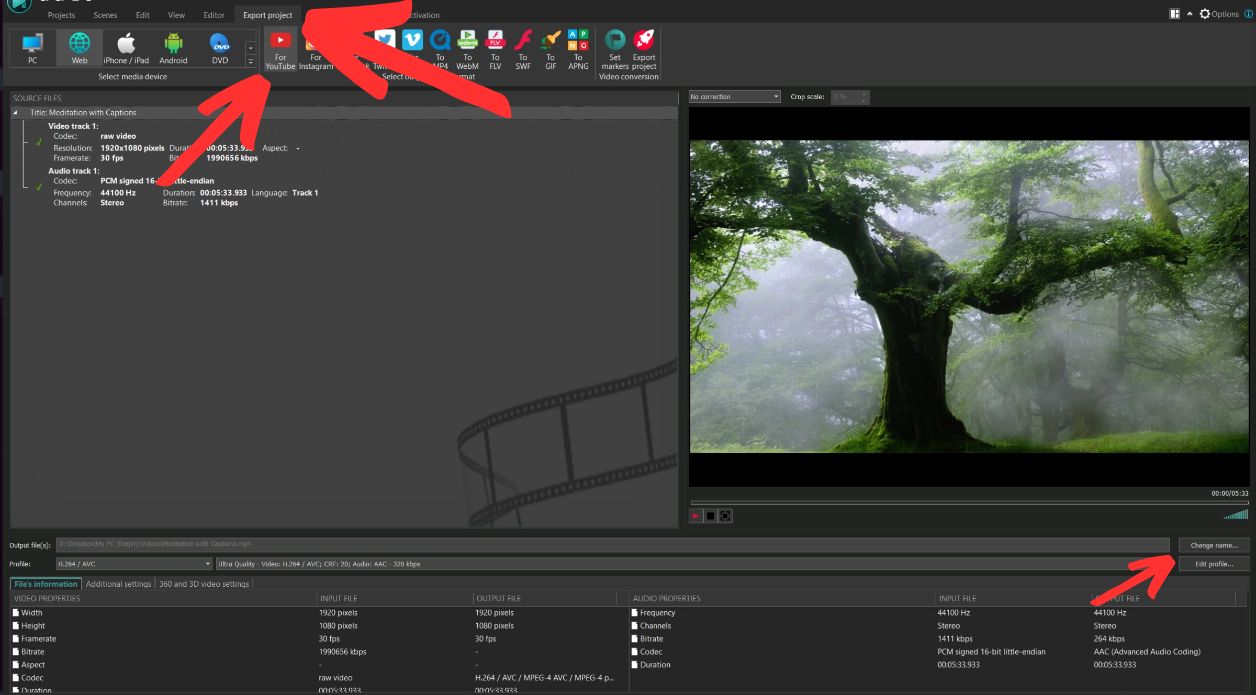
Now that you have your video, let's make the video file. Click on "Export Project" and ensure you have the file exporting to where you want it to go. You can change the location by clicking "Change name..." Finally, click on the red circle with the rocket that says "Export project". Watch your video through when it's done. Congrats you've made your first captioned/lyrics video!Where to send your completed video
Put it in the collective GoT video assets folder.https://go.gameoftomes.org/SharedGoTVideosThen send Diane Morrison and Makenzie Turney the links.
Where to learn more
WIP
Streamer
Missing
Status: Location Unknown
Deceased
Status: Deceased Character
Retired
Status: Retired Character or Article













Comments